How to improve cloud security with AWS Client VPN in 10 minutes
Many organizations rely on AWS Security Groups to manage access to private resources. However, most risk-ignorant organizations provide overly optimistic access, such as allowing connections from any IP address (0.0.0.0/0). This approach is often adopted to avoid the administrative burden of updating IP addresses whenever users change locations, such as moving between offices, working from home, or accessing resources from public Wi-Fi networks like Starbucks.
Another frequently used and more secure method is maintaining a whitelist of IP addresses for each user. While this approach can provide more granular control, it can become cumbersome as users change devices or network configurations. In practice, this often leads to multiple IP addresses being whitelisted per user, further complicating security management.
While some organizations employ Bastion Hosts to provide a more secure access point, this method can introduce inefficiencies, particularly when dealing with Remote Desktop Protocol (RDP) access. Bastion Hosts often require additional configuration and management overhead.
AWS Client VPN offers a more secure and efficient solution for remote access to private resources. By establishing a VPN connection between a user's device and the AWS network, Client VPN provides encrypted communication and granular access control. This eliminates the need for complex IP whitelisting or overly permissive Security Group rules. Additionally, Client VPN can be easily configured to support various remote access scenarios, such as VPN connections from home offices, public Wi-Fi networks, or mobile devices. It can easily be used as an additional security measure in conjunction with bastion hosts.
In this article, you will learn how to quickly set up AWS Client VPN to access your resources in private subnets instead of updating the security groups and keeping them neat and clean.
1) Download and install OpenVPN easy-rsa utility to generate server and client certificates.
2) Run the following commands with default values
Windows:
.\EasyRSA-Start.bat
# ./easyrsa init-pki
# ./easyrsa build-ca nopass
# ./easyrsa --san=DNS:server build-server-full server nopass
# ./easyrsa build-client-full client1.domain.tld nopass
# exit
Linux:
git clone https://github.com/OpenVPN/easy-rsa.git
cd easy-rsa/easyrsa3

./easyrsa init-pki
./easyrsa build-ca nopass
./easyrsa --san=DNS:server build-server-full server nopass
./easyrsa build-client-full client1.domain.tld nopass
3) Copy 5 files into a new folder
pki/ca.crt
pki/issued/server.crt
pki/private/server.key
pki/issued/client1.domain.tld.crt
pki/private/client1.domain.tld.key
4) Import Server and Client certificates into AWS Certificate Managers by running the command from the folder you just copied the files
aws acm import-certificate \
    --certificate fileb://server.crt \
    --private-key fileb://server.key \
    --certificate-chain fileb://ca.crt

aws acm import-certificate \
    --certificate fileb://client1.domain.tld.crt \
    --private-key fileb://client1.domain.tld.key \
    --certificate-chain fileb://ca.crt
or import them manually via console
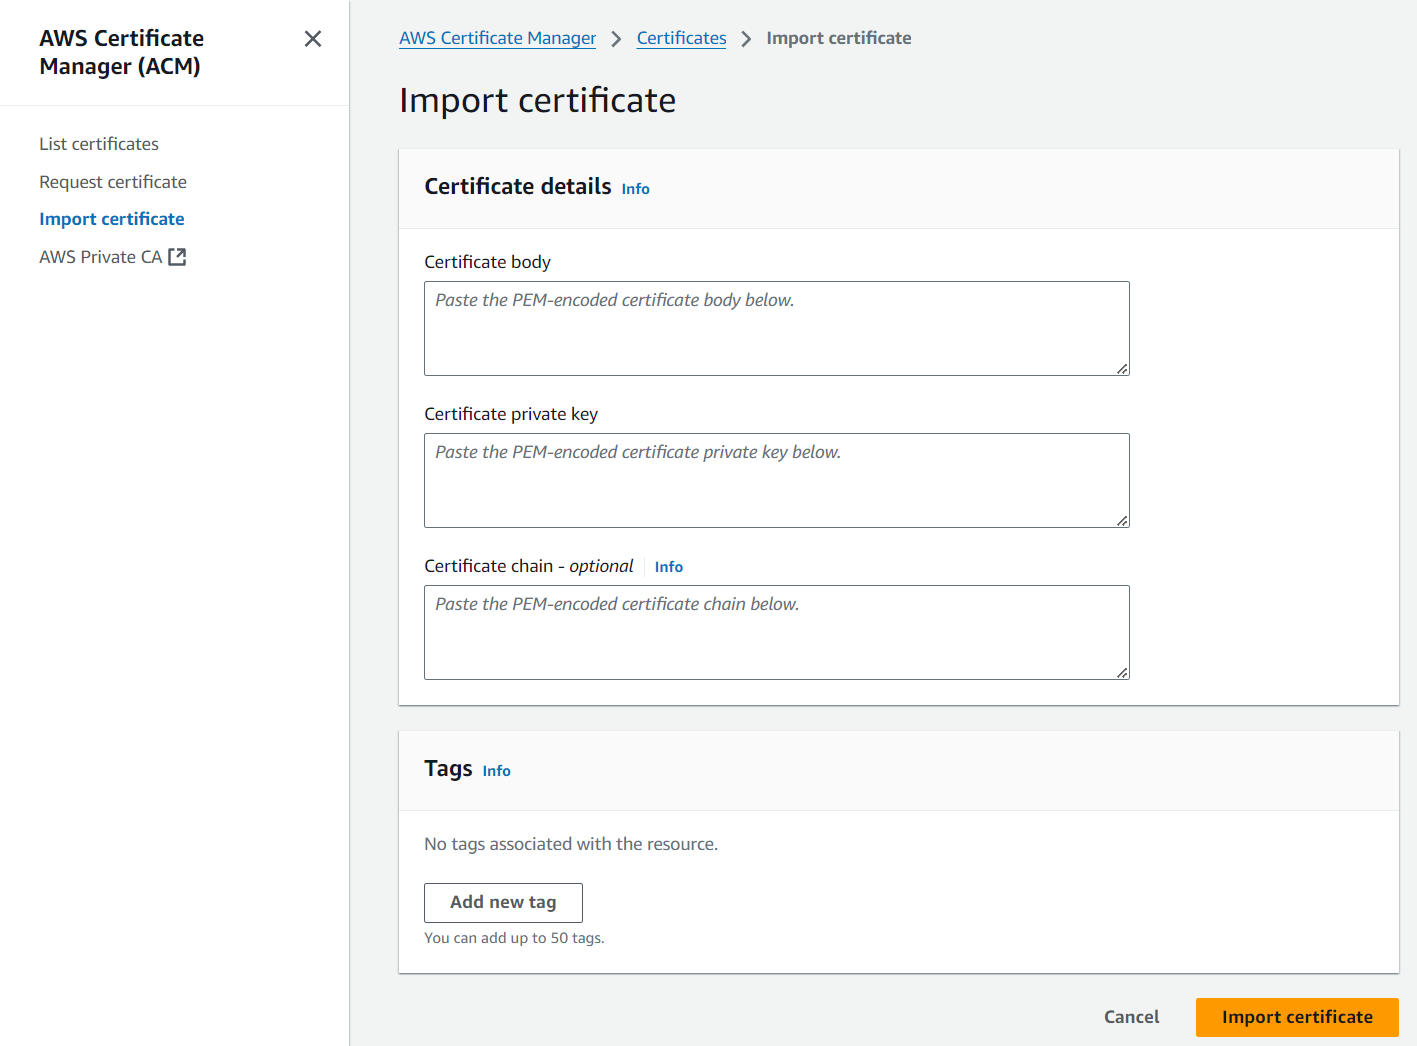
where Certificate Body is the content of server.crt file, Certificate Private Key is the content of server.key file, and Certificate Chain is the content of ca.crt file. Repeat the same steps for client certs with client1.domain.tld.crt, client1.domain.tld.key, and ca.crt files.
5) Create a new security group (for example, SG-VPN) and grant access to
- TCP 443 with 0.0.0.0/0 source
- UDP 1194 with 0.0.0.0/0 source
You can update the source to be more restrictive if your security requirements require it.
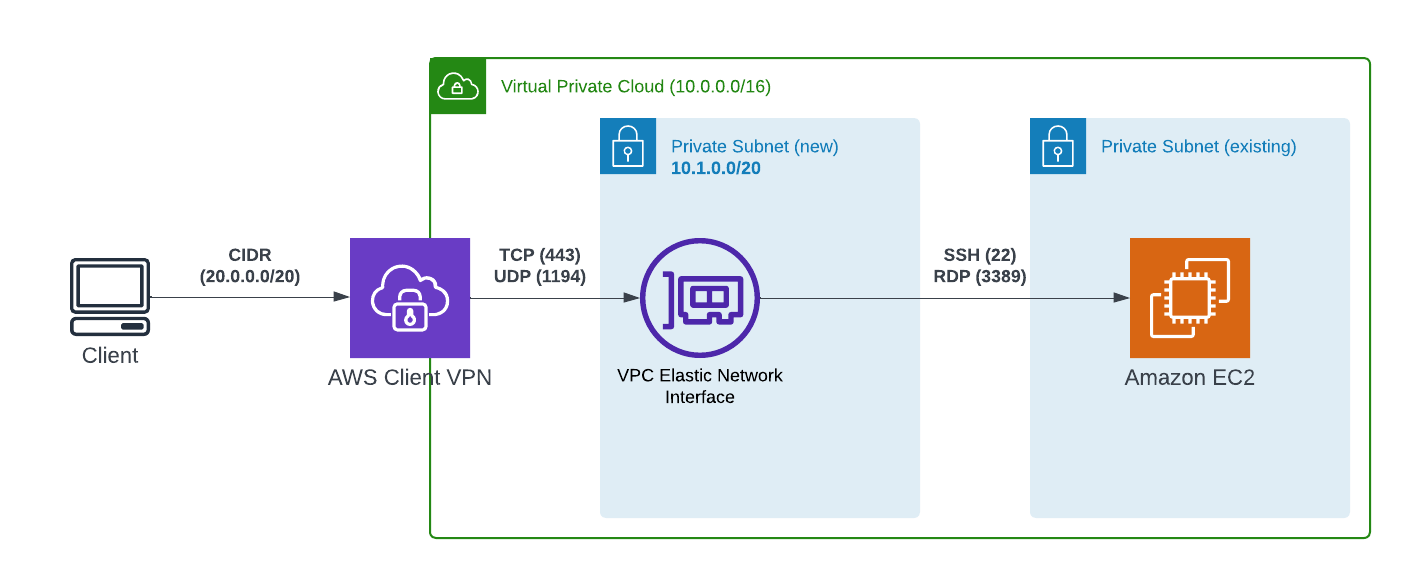
6) Create a new subnet. If your VPC has a range of 10.0.0.0/16, use 10.1.0.0/20 or whatever IP range you plan to use for the subnet.
7) Now it is time to create a VPN endpoint. Navigate to VPC -> Client VPN endpoints menu under the Virtual Private network section. Then click on "Create client VPN".

8) Set VPN settings
- Client IPv4 CIDR to be 20.0.0.0/20 or any value you want your clients to be assigned after successfully connecting to the VPN
- Server certificate ARN - select the server cert you imported in Step #4
- Enable Use mutual authentication option and select the client cert you imported in Step #4
- Important! Turn on Enable split-tunnel. It will save you money on VPN traffic and make your clients' lives more enjoyable.
- Select your VPC ID
- Turn on Enable client login banner and provide a welcome message the clients will see after establishing a connection
9) Click "Create Client VPN endpoint". It may take a few minutes to create it.
10) Congratulations, you just created your VPN endpoint. Now click on it, and then on the "Target network association" -> "Associate target network". Then pick your
- VPC ID
- Subnet created in Step #6
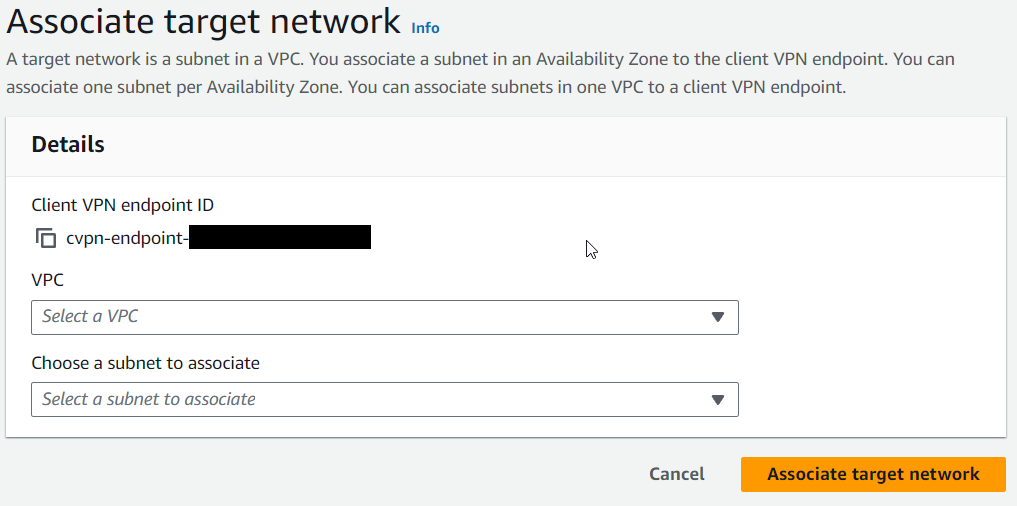
and click the "Associate target network"
11) On "Security Groups" tab make sure that the SG-VPN group is selected (we created it in Step #5)
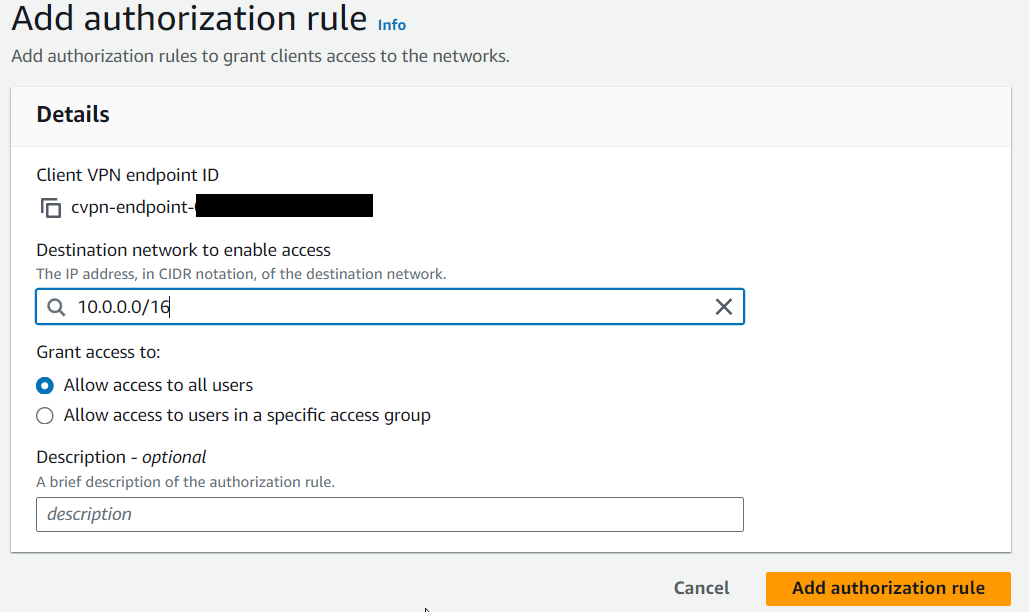
12 ) On the "Authorization rules" tab, click the "Add authorization rule" button and provide your VPC IP range, such as 10.0.0.0/16.
13) At this point, you have to wait a minute until your changes are propagated. When it is finished, your VPN is ready to be used.
14) Now, let's configure the certificate, which will be shared with VPN clients. To do it, click the "Download client configuration" button on the top of the screen.

15) After it is downloaded, open it with a text editor and add two empty tags at the end of the file
<cert>
</cert>
<key>
</key>
16) Add content of the "client1.domain.tld.crt" file inside of the "cert" tag and "client1.domain.tld.key" inside of the "key" tag. Save the changes.
17) Download and install VPN client from https://aws.amazon.com/vpn/client-vpn-download/
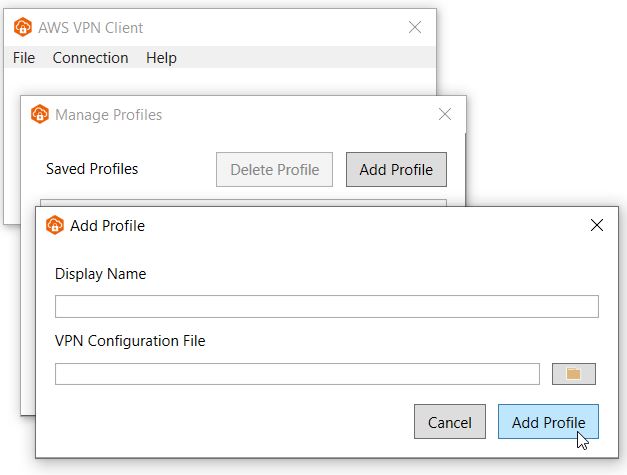
18) Open the VPN app and navigate File ->Manage Profiles.
19) Click “Add Profile” and select config.ovpn file you created in Step #16.
20) You are all set. Click the "Connect" button to make sure t at the client can successfully connect to VPN. You should see the login banner provided in Step #8.
Are you looking for help? Reach me any time.